In the early hours of the 10th of June 1940, elements of the 51st Highland Division (51st HD) were hurriedly slogging through the ditches along the road headed towards the tranquil French fishing village of St.Valéry-en-Caux. The road was chocked with fleeing civilians. Scattered about were the remains of bodies and burnt vehicles, knocked out by the constant swam of the Luftwaffe’s merciless Stukas. The Royal Air Force (RAF) fighters had rarely been seen providing air support over the division for the entirety of the fighting retreat from Abbeville. Commanding the Allied IX Corps, was a Scottish Lowlander, General Fortune, who had taken over from mentally fatigued French General Ihler. Fortune had received orders from the British War Office on June 8th to adhere to General Weygand’s, the combined allied commander, order to fight their way to the Seine and cross the river using the ferries. The out of touch and defeatist Weygand, had not considered or wilfully disregarded the dire situation of IX Corps. The units of corps were critically low on ammunition after the capture of the supply dumps during Hoth’s 5th Panzer Division rapid drive through the overstretched allied lines along the Somme. Flying ahead of IX Corps was Erwin Rommel’s 7th Panzer Division, who captured the river crossing at Rouen. Fortune knew his men could not force their way across the Seine, and the only hope to save the Corps was to head for a port along the coast to wait for a Royal Navy evacuation.[1] The only question in Fortune’s mind was which port would be suitable for the withdraw of the Corps, which would allow him to save the 24,000 allied troops under his command.
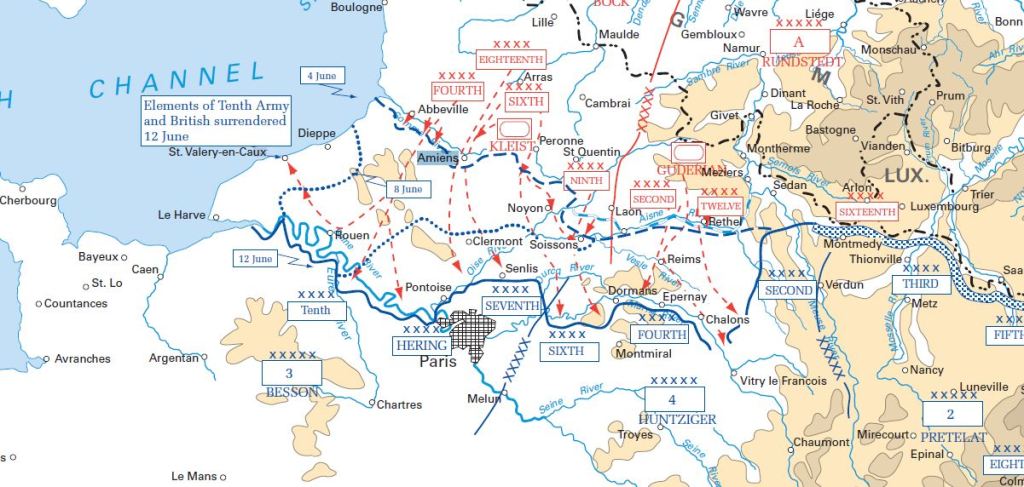
After consulting with General Ihler, Fortune planned a four-day withdrawal to the Port of Le Havre, which accounted for the slow-moving and demoralised French units. Still waiting for permission to evacuate from the War Office and Weygand, Fortune needed time. Lamentably, time was in short supply and IX Corps could not move with enough speed to outrun Rommel’s 7th Panzer Division, who struck north to Fécamp preventing the allied army from accessing Le Havre. With Hoth and Rommel pressing the battered Corps from two directions, early on the 11th of June, Fortune made plans to make of St. Valéry the central point of embarkation. On the outskirts of the village, the IX Corps took up defensive positions that ringed the hamlet. The remnants of the French 2nd, 5th, 31st, and 40th Divisions held the centre, while highlanders secured the flanking positions.
While futilely attempting to dig into their third set of entrenchment, without entrenching tools,[2] in the same number of days, the Highlanders watched in astonishment as drunken French soldiers wandered about aimlessly across the countryside waving white flags, looting homes, and carrying suitcases bursting with food.[3] As the day progressed, torrential rain beat down on the men of the 51st HD. While, in the distance, German tanks were manoeuvring to make their final assault upon the exhausted and surrounded men of the IX Corps. Adding to the confusion, units assigned to man key locations that commanded the town of St. Valéry failed to secure their objectives before the German armoured assault on the afternoon of the 11th of June. Many French units never attempted to carry out their orders and waited for the inevitable. Meanwhile, on the outer perimeter, Gordan Highlanders, Philip McCarron and his assistant gunner sat in their muddy trench near Saint-Riquier-ès-Plains with their Boys Anti-tank Rifle watching the German tanks apprehensively, knowing they only had two .55 calibre bullets that merely scratched the paint on the Mark II panzers.[4] Nevertheless, the men of the 51st HD accompanied by a few stalwart French units were confident that they could hold out long enough for the Royal Navy to evacuate them from the St. Valéry. Despite their fighting spirit, Fortune’s failure to secure the cliffs that commanded the town, as well as the harbour and beaches would prove to be another tactical blunder, in a campaign markedly defined by failures of leadership, once the Panzers manoeuvred their way around the outlying defences.[5]
After an intense day of repelling repeated German assaults that resulted in significant casualties, the order was given at 2200 for portions of the IX Corps to fall back into the town so that a Royal Navy task force under the command of the maverick, Admiral Sir William James, could begin evacuation. Due to the gaps in the defensive lines and the refusal of the British government to authorise embarkation without French acquiesces, the order to evacuate never reached the heavily engaged units of the 2nd Seaforth and 1st Black Watch. No such orders were ever passed along to the remaining French troops because of Ihler’s defeatist mental state.[6] Nevertheless, upon arriving in the town, the exhausted soldiers of the 51st HD were met with a scene of absolute chaos. Artillery and machine-gun fire incessantly rained down, covering cobblestone streets were the dead and dying men from various units.[7] As the men endeavoured to find cover on the beach from the German’s firing down from the cliffs, a thick fog descended on the town. Some units unable to breach the German net around the city made an effort to drop down to the beaches by tying together their weapons slings or whatever they had. Many men fell to their deaths before the effort was abandoned or more cordage was added.[8]
Out at sea the mixed military and civilian evacuation force struggled to coordinate their efforts due to the lack of wireless communications and their inability to use signal lights that would alert the Germans to their approach. Still awaiting the official evacuation order from the War Office, Royal Navy ships were ordered to withdraw from the coastline before dawn. Adding further confusion to the disorganised operation, many civilian boats mutinied and demanded to be towed back England by their destroyer escorts.[9] Despite these conditions, shore parties from HMS Codrington were evacuating the wounded, while under severe fire from German units arrayed along the cliffs. Observing the tactical situation and the suicidal nature of the approach to St. Valéry, the Captain of the HMS Saladin, informed his superiors that an evacuation could not be attempted until the cliffs were cleared of Germans. Due to the heavy fire, air attacks, and the fog Admiral Sir James decided to postpone the evacuation until the night of the 12th. James sent a runner to the commander of 51st HD, General Fortune, with a plea to hold out until nightfall. All remaining ships were directed to Veules-les-Roses, where 1,300 British rear echelon troops and 900 French troops were taken off in the early morning hours of the 12th of June.[10]
Few soldiers of the Highland infantry were rescued from the beeches of Veules-les-Roses due to a lack of wireless communications, which habitually hampered Fortune’s ability to maintain command and control throughout the Battle of France. The departures at the Veules-les-Roses were called off when British ships gained the attention of German artillery and tanks. Despite the failed embarkation, Fortune was determined to clear and hold the cliffs in order to assist the Royal Navy. Up until the previous night, however, the 51st HD retained limited anti-tank capabilities, but Fortune had ordered his troops to destroy all non-personal equipment, which meant his men would be engaging tanks with assorted small arms. As Fortune was preparing what men he could muster to assault the heights, the French soldiers holding the centre capitulated at 0800 on the 12th of June. It would only be a matter of time before the General Fortune would also surrender. That time came at 1030, not wanting to risk further loss of life, Fortune gave the order that every solider dreads to receive, ‘every man for himself,’ adding ‘good luck!’[11] When asked by company commanders for the ability to fight on as individual units, Fortune forbade it fearing reprisals from the German with so many British and French prisoners of war (POWs) While a few enterprising Highlanders made daring escapes to Royal Navy ships or commandeered small boats, the majority of the 10,000 men of the division were made POWs and would spend the remainder of the war scattered about in various labour camps in Germany and Eastern Europe.
Throughout the course of the war, an estimated 365,000 British fighting men would have the great misfortune to become POWs. The total number of British servicemen that fell into Japanese and German hands is ultimately unknown.[12] With the nation on a war footing, few British families were not untouched by the effects of the war and experienced a deep sense of trepidation when reading through the list of names callously printed in the morning’s post. Confinement, like death, was not discriminatory, but the regional recruiting structure of the Highland regiments meant that the burden of imprisonment impacted Highland communities to a greater extent than elsewhere in Britain. Much like the men on a chessboard, the British government took the view that these forces, while theoretically still in existence, were no longer at play in the game.[13] With that mind and in light of the Herculean effort made to evacuate the British Expeditionary Force I (BEF) at Dunkirk, how can one explain the circumstances that led to the decision of the British government to abandon the 51st HD units desperately fighting for survival along the Normandy coast during the Battle for France? Moreover, do the assertions made by some historians of the poor combat performance of these units[14] stand historical muster when considering the totality of decisions made by the British War Office before these units were deployed and in light of the tactical circumstances on the ground during the campaign?
When considering the manner in which the British High Command conducted themselves during the Second World War, one glaring observation is the seemingly wanton disregard for the common soldier compelled to fight to sustain an Empire that was, not only unjust, but instantiable given the constraints of a system straining under the weight of its self-fulfilling limitations. Accordingly, the loss of vital British fighting men and material throughout the Second World War was due to failures in strategic planning, as well as misguided affairs of honour that cost the Commonwealth irreplaceable men in a fruitless attempt to defend a crumbling Empire. These failures are blatantly evident in British High Command’s lack of pre-war planning, refusal to comprehend the tactical situation on the ground in France, and the blatant disregard of the plight of the troops fighting under the command of defeatist French Generals, all of which culminated in the wanton abandonment of the 51st HD in a futile attempt to keep a demoralised French Army in the war.
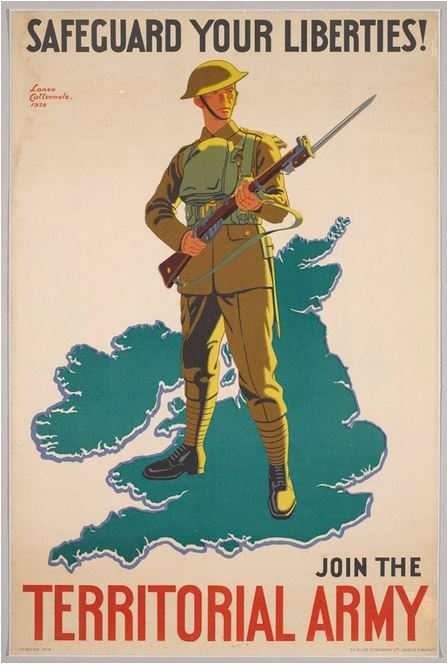
The compelling story that this research paper will attempt to tackle is to untangle the multifaceted elements that led Britain to abandon the 51st HD in a questionable attempt to support a demoralised French Army that was collapsing on many fronts. More specifically, the focus will be upon circumstances surrounding the 51st HD, who were left to their predictable fate at the port of St. Valéry on the Normandy coast with an unsanctioned British Naval evacuation fleet waiting just out of range of German artillery. Additionally, a brief analysis of other British capitulations that demonstrate the lack of strategic planning on the part of the British High Command is also called for given the fact that the blame for the surrender of the 51st HD fell on Major General Fortune and the fighting spirit of the men under his command. A theme that will be repeated by the British government throughout the war as hands where rung and indignant questions asked about how such an occurrence could come to pass. The politicians and staff officers who chorused their disapproval seemed less inclined to remember their part in the neglect, complacency, and ineptitude of the pre-war years, all of which contributed to the fate of the 51st HD, as well as other capitulations that occurred during the Singapore and Greek campaigns.
Failure of Strategic Planning
The Interwar Years: Misallocation of Limited Resources
After the Great War, the approach to military readiness that many nations took during the 1920s was not merely a matter of war-weariness, and the necessary cutbacks required after accumulating large national debts sustain the war effort. Rather each nation chose to spend their limited resources elsewhere, in areas that may or may not have prepared the state for the conflict that lay just on the horizon. Moreover, almost every nation in the world was affected by the economic turbulence of the post-Great War years, which forced them to institute some form of command/interventionist economy. As a consequence, no nation was able to build their ideal military during the 1930s to meet the threat of a rearmed and aggressive Germany. Even if a nation could have allocated more of the national wealth towards readiness, a nation’s leaders would have to correctly discern what were the lessons of the previous war and what technologies had been developed that altered the nature of warfare. Such strategic planning is a difficult task, which is subject to the inherent flaws in human nature. Such failings preclude leaders from prudently assessing the correct lessons or understanding the implications of technological advancements. One observes this dichotomy within France and Britain during the inter-war years, where successive governments failed to implement coherent strategies that took into account the changes brought about by the Great War.
France
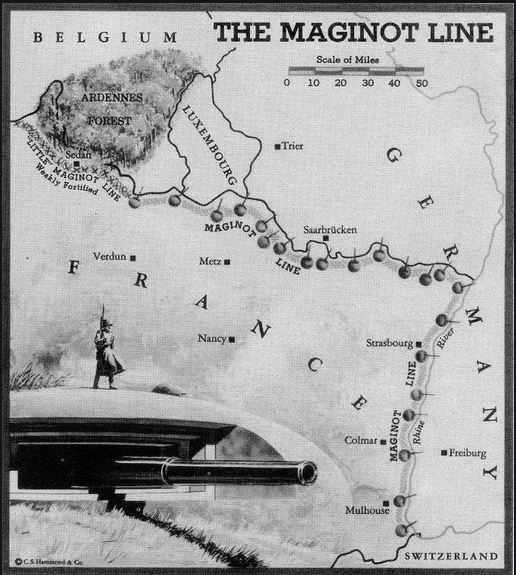
In the case of France, they were less affected by the economic downturn because they chose not to devalue their currency. The negative externality of this governmental economic policy causes a significant inflation issue, which meant that their domestic weapons manufacturing became rather costly after the crash in the late 1920s. Despite the inflation issue, the French still had a tangible currency. Nevertheless, the main issue with France’s economic outlook was expenditures on the inadequately designed Maginot Line, which was spread out over a time frame of six years, and cost around five billion Francs. Conversely, German spent nearly twice that amount on the Siegfried Line. Despite that fact, the French were defeated and the Maginot Line becomes a symbol of the misallocation of resources of the French government.[15] Given the technological advancements brought about by the Great War, the French should have spent more on up to date tanks, anti-tank weapons, training the Cosmopolitan Army in defence-in-depth tactics, and, most crucially, modern aircraft rather than allocating their limited national wealth on a chain of forts that could hardly support each other with interlocking fields of fire, as the soldiers of the 51st HD would come to understand during their time defending the line in the Saar region.[16]
With all that said, the Maginot Line did achieve its strategic objective of diverting a German offensive away from that portion of the French frontier. The French wanted to deny the German Army an avenue of approach through Eastern France as they had done two times before. Moreover, French propaganda had the German High Command very much wary of the purported defences. Nevertheless, the foremost allocation priorities for the French were not static fortifications; despite the fact that the Maginot Line held strategic value. The failures of the French military leadership become apparent when one considers the fact that they built the fortifications with thrift in mind. By employing historical inference, one comprehends that the French should have invested more in the defences and extended its length across the Franco-Belgium border. Instead, the French built a budget border defence that effectively ended the French border with Luxembourg.[17] Part of the French government’s thinking was its policy of ensuring the next war would not be fought on French soil. The French planners did not consider the possibility of the Germans aiming the main focus of their assault elsewhere. If the Germans stuck from the South the French Army and the BEF in the North would be placed in serious jeopardy, which is what occurred when Manstein’s Fall Gelb punched through the lightly defended Ardennes.
The other failure of French strategic planning was the idea that their expenditures on a Navy would discourage Germany or Italy from attacking. Both aggressors were not significantly discouraged from attacking either France or Britain based upon Naval considerations. Indeed, both Fascist nations had poultry surface forces with which to confront the combined fleet of Britain and France. Regardless of that fact, the French proceeded with a major naval improvement programme to secure French colonial possessions that might have been threatened by Italy’s territorial aspirations. The French also invested heavily in battleships, which discounted the fact that advancements in the reliability of aeroplanes had rendered battleships obsolete.[18] As a result, the French spent a considerable amount of their limited resources on its Naval programme, as well as improving its Naval base in Mers-el-Kébir, which served no tactical value in their battle against Germany.[19] Consequently, the resources wasted on the Navy took funding way from other more crucial elements of defence that could have been used to modernise the French Army and Airforce. Such miss-allocation of resources becomes even more poignant, considering the British were forced to eliminate the French Navy as a threat, while still moored in the harbour of Mers-el-Kébir.[20]
While the Navy was being adorned, the French Metropolitan Army languished in mediocrity and neglect until the 1930s. The Metropolitan Army General Gamelin inherited in 1931 was primarily comprised of conscripts, was not well trained, inadequately equipped, and poorly led. Notwithstanding the commonly held belief that the French had the “best” army, the real combat-proven French troops were her colonial forces that enforced French hegemony within her colonies. These colonial forces had the necessary combat experience and leadership, which should have formed the core of the French Army’s resistance to Germany during the six-week campaign that was the Battle for France. Despite these challenges, Gamelin set about on a modest mechanisation and modernisation programme that was continually hampered by budget shortfalls. Those deficits had real implications for the French Army, considering the fact that during the same amount of time it took France to stand up one light armoured division, the Germans had formed three Panzer Divisions. Gamelin also neglected essential combined arms troop that are vital in preparing and coordinating defence-in-depth tactics. While limited French exercises proved that tanks could be halted by a combination of terrain denial, artillery, mines, and anti-tank armed infantry fighting alongside allied tanks, Gamelin did little to encourage or allocate the necessary funds to train the Metropolitan Army in these complex tactics.[21]
While the Army slowly muddled its way towards modernisation, advancements within the Armée de l’Air was also significantly troubled by a lack of strategic planning. The major stumbling block for the French was their instance on improving existing weapon systems, instead of funding scientific innovation like the Germans. Air Minister Cot, a fanatical socialist, squandered his budget turning his ministry into a bloated government works that would employ large numbers of works making only a few types of aircraft. Cot pushed the idea of multi-purpose aircraft that could function in several roles. This policy led to the production of unexceptional aeroplanes such as the severely underperforming Bloch MB.210 bomber and Dewoitine D.500 fighters. Moreover, this policy meant that there would be no close air support aircraft, like the Junkers Ju 87 to assist Gamelin in his half-hearted attempt to develop defence-in-depth and combined arms tactics. By 1934, of the 1,500 aircraft Cot produced 50 per cent were multi-role bombers and 29 per cent fighters. While the designs were initially better than the Luftwaffe, they were quickly outdated by 1937.[22]
Despite understanding the threat, a re-armed and aggressive German posed to France, by 1935 the government had squandered its opportunity to effectively plan for the coming war and was on the verge of bankruptcy. Naturally, with limited and misallocated resources, the French were not prepared, based upon the policy decisions and expenditures that the government made before the war, to bear the brunt of the German juggernaut by themselves. Indeed, the French hope was that the Allies would provide significant forces to allow them time and tactical space to gear up after hostilities had commenced. As a consequence, French leaders had placed too great a hope on a collation war effort, which would allow for time to build up their own resources, as well as equip and retrain the Metropolitan military. The main issue with this policy was the Germans. When war broke out, the French would bear the brunt of the German attack, while the Holland and Belgium operations were just diversions for the main thrust. The possibility of this occurrence was not factored into their planning because the French thought that they would have considerable assistance and time to adjust their forces before they were forced to fight an all-out war against Germany. Quixotically, the French hoped that the Allies would supply the necessary forces and material so that they would not have to bear the burden of another ground war with Germany after the losses sustained during the Great War. [23] Prudence dictates that the French government should have consulted with their allies before formulating their assumptions because the British had no intention of fighting another protracted war on the Continent, and the Low Countries insistence on neutrality would effectively mean there was no cohesive strategy to militarily contend with a resurgent Germany.
Britain
The British were in far worse circumstances in financial terms when compared to their French allies. While economic considerations greatly impaired the War Office’s interwar budget, the greatest policy failure of the British government was their belief in the utopian diplomacy ideals of Woodrow Wilson embodied within the League of Nations. This new global diplomatic organisation would be the most advantageous way to handle armed conflict in the future and member nations would combine their militaries to deal with those threats. Thus, there was no need to maintain large military forces. Adding to these assumptions was The Ten-Year agreement by the British government in the fall of 1919, which stipulated that each year defence spending would be based on the assumption that that would be no major conflict for ten years. Consequently, each year Parliament voted to reduce the defence budget. Those funds were spent on the Royal Navy and social-welfare programmes. Indeed, the only branch of the British military that was modernised and expanded was the Royal Navy. Construction of new battleships, cruisers, destroyers, were justified to maintain the Empire’s trade routes. Wilfully blind to the advancements in aircraft capability that made these surface vessels obsolete, the British government pursued a policy that they assumed would ensure she ruled still the waves.[24]
Based on those questionable assumptions, successive British governments developed and maintained a limited war strategy. The army’s primary role was to provide the security of the British Isles and the defence of the Empire. Under no circumstances would it be allowed to prepare for a major military engagement. [25] The Ten-Year rule held sway until 1931 when military leaders observed the storm clouds forming over Germany. The military was constrained by financial problems and closed-minded politicians who only agreed to modest increases in the defence budget. Meanwhile, Germany was extensively increasing its military in open violation of the limitations imposed by the Treaty of Versailles. By 1936, a five-year modernisation and rearmament programme was agreed upon, but the Treasury implemented a system of rationing that divided the funds between the three service branches. The next year the Cabinet formulated a list of military priorities: the expansion of the Army, anti-aircraft capability, and aircraft. In response to this policy change, the RAF placed orders for aeroplanes that maxed out the British industrial capacity to produce the numbers ordered. While new recruiting targets were set for the Army, true mechanisation and modernisation programme did not get underway until after the Munich crisis in the late Spring of 1938.[26]
In the event of war, the British would only maintain a small army on the continent. The majority of the British war contribution would be performed in the sea and air, as well as providing financial assistance. In 1937 the policy of limited liability was cemented by Thomas Inskip, Minister for the Coordination of Defence. Inskip outlined the four strategic objectives: 1) Defence of Britain against air attack, 2) Protection of Imperial trade routes, 3) Security of the Empire, 4) Co-operation with Allies in defence of their territories. In 1938, under pressure from France, the Chiefs of Staff added that the safety of Britain could not be maintained if France were overrun. Consequently, if a state of war were declared a significant deployment of British troops would immediately embark for France.[27]
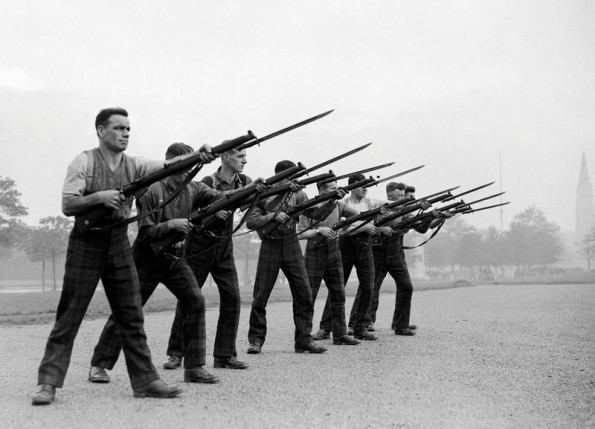
Despite these shifts in governmental strategies, it was a woefully late change to have any significant impact on the disposition of the equipment issued to the army. The single area where the British Army excelled was in the development and experimentation with one partially mechanised division, the Experimental Mechanised Force. However, the budget for these brigades severely restricted the Chiefs of Staff’s ability to bring their insights to fruition. This economic reality meant that, like their French allies, they would not spend any significant funds on scientific advances, which fostered the development of tankettes. The chassis for these tankettes would, in 1934, became the bases for one completely mechanised armoured brigade but Chiefs of Staff failed to take the next logical step to form a true armoured division, along the lines of the German Panzer divisions. Nevertheless, the British did equip command vehicles with wireless radios, which meant little in terms of command and control for mechanised units. These radios would serve as the primary communications link for infantry units during the Battle of France.[28]
This malaise also extended into the infantry and artillery units. Training for both regular army and territorial units consisted of route marches, drilling, and weapons fundamentals. Little funds or time was invested in exercises that utilised defence-in-depth or the combined arms manoeuvres. Even more shocking, is the fact that the Chiefs of Staff ordered basic and specialty training to be condensed from two years to only three months. Generally, the small arms that formed the personal equipment of the individual infantryman and artillery pieces were little changed from 1918. The Lewis machine-gun was replaced by the lighter weight Bren gun, but the main anti-tank weapon developed for the infantry was the .55 calibre Boys rifle. The Boys rifle was only effective against lightly armoured vehicles, such as the Panzer I tank. The weak .55 bullet could not penetrate the armour the Czechoslovakian made LT-35 and LT-38 models that the Germans fielded during the Battle of France. The additional anti-tank weapon issued to artillery troops was 25mm Hotchkiss anti-tank gun. The Hotchkiss suffered from the same issue with the Boys, the small slow-moving projectile could not puncture the armour of German tanks and was only fielded to the troops in Belgium with almost no ammunition. Consequently, inadequately trained British troops were sent into combat with no effective means to defend against or attack German tanks. [29]
The most critical lack of strategic planning for the army was in regard to communications. When the BEF deployed to France, the British Army was still employing antiquated field phones that were easily cut by hand or by artillery fire. Headquarters units were also heavily reliant on civilian landlines for communications. During the dynamic engagements of The Battle of France, the vulnerabilities of reliance on these communications systems severely obstructed the Allies’ ability to coordinate their operations and quickly counter German attacks, which directly led to the encirclement of many units.[30] Sadly, the War Office would never rectify the communications situation, as the events of Operation Market Garden would later reveal. Despite this blatant oversight, British troops improvised by employing a combination of Very flare guns to signal artillery of the need for assistance, and dispatch runners with a limited degree of success. The problem with this innovation was that it required time, which was a luxury that the speed of German advances rarely afforded.[31] To further complicate the lacklustre command and control situation, the British officers commanding these men were solidly set within the defensive warfare mindset, where positions were expected to hold to the last man and there was no training on the rationale behind strategic withdrawals. [32] The culmination of these factors would have grave consequences for the men of the BEF I in France and would plague the British in every combat operation for the duration of the war.
The situation within the RAF was only slightly less acute. The Air Ministry suffered from the same funding issues as the Army. But by 1933, the RAF did initiate a modernisation programme that replaced biplane bombers with the Heyford, though the RAF conducted few realistic exercises to develop strategic bombing tactics nor invested in night-time navigation equipment. The condition of counter-air capability was similar, in 1934 the RAF ordered the Hawker Hurricane to replace their large inventory of biplane fighters. These new aircraft were intended to defend limited regions of British airspace. They were designed to be fast and manoeuvrable, which meant they had a limited range. Given the defensive thought behind the design of the fighters, RAF Fighter Command neglected to develop an effective close air support aeroplane. The iconic Supermarine Spitfire would not enter service until 1938 after rocky inception and would be subject to the same limitations of RAF strategic planning. The consequence of the RAF’s defensive mindset resulted in the lack of planning for air-cover and support for ground troops operating outside the range of fighter cover.[33] The subsequent fighting retreat of the 51st HD would suffer from almost continuous German air attacks, despite urgent appeals from General Fortune for air support. The War Office’s refusal to commit significant numbers of fighters to the battle in France to support British troops still fighting to keep them in the war is one of the central factors that contributed to the Highlander’s encirclement at St. Valéry and the collapse of the evacuation attempt by the Royal Navy.[34]
The abovementioned points are historical considerations that are relatively new to the analyses of the British and French pre-war mobilisation efforts. For some time, the narrative was that Allied military doctrine was fundamentally flawed. The reality is that the Allied approach to combating the Germans in 1940 was not that different from the doctrine employed during the Normandy campaign in 1944. The Allied forces utilised what the French termed methodical battle, which involved a combined arms approach with defence-in-depth tactics. Meaning the Allied forces attempted to coordinated armour, artillery, infantry, and air support to combat the German offensives. Accordingly, many field commanders understood what it took to delay or halt the type of swift armoured attack that the Germans were employing, defence-in-depth with combined arms support. Nevertheless, there is a separation between understanding military theories and employing those concepts on the ground against an active enemy. Indeed, the futility of attempting such complex manoeuvres with poorly trained and equipped armed forces was made brutally apparent during The Battle of France. Famed military strategist, Carl von Clausewitz, recounts that military theory is easy, but it is the act of employing those principles in combat that is the difficult portion. Accordingly, the outcome that the Allied armies were endeavouring to achieve in 1940 was not a matter of flawed doctrine, the real issue was that the Allied field commanders did not have enough trained troops, modern equipment, air support, and both armies were neglected by their civilian government due to questionable assumptions that led them to squander their limited resources pursuing erroneous strategic plans.
Commitments of Honour & Squandered Resources
Greece
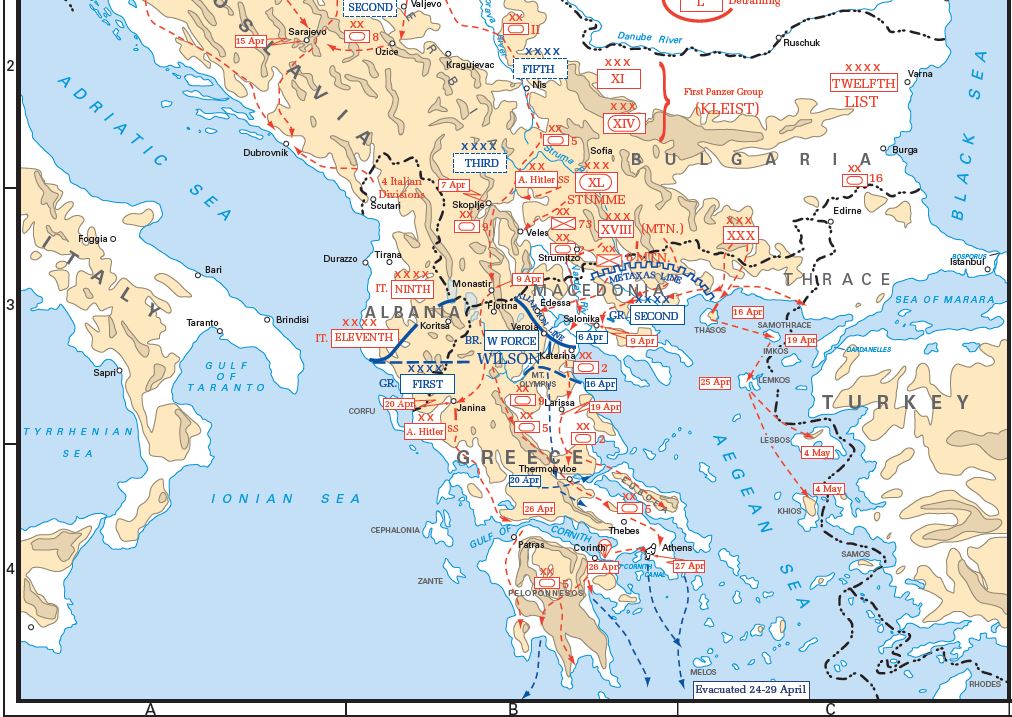
The other central element to facilitate one’s understanding of why so many British troops were captured throughout the war was Churchill’s failure to comprehend the tactical situation throughout the Empire and his instance on committing British forces in imprudent affairs of honour such as in Greece. As the Italian invasion of Greece foundered and the reputation of the Axis powers hung in the balance. Hitler decided to delay Operation Barbarossa to secure his Southern flank and bolster the impotent Italian invasion. As German forces began their build-up along the river Danube, Churchill in an affair of honour and with vain hopes of swaying F.D. Roosevelt’s administration of his fervent commitment to continue the war sent 58,000 commonwealth troops garrisoning the British colonial possessions in the Middle East to shore up the outmatched Greek army, who were about to be fighting on two fronts.[35]
When General Sir Maitland assumed the command of Greek BEF, he received a rather unrealistic briefing from the War Office, which was infused with Churchill’s over the optimistic assessment of the prospects of holding back the forthcoming German assault. After the meeting in Athens, Maitland was overheard to say that he had already ordered maps of the Peloponnese in anticipating the eventual need to plan an evacuation of British forces. Despite holding strong positions in the mountainous terrain along the Aegean coast to the mystic slopes of Mount Olympus, the meagre Allied troops could not contend with the focused concentration of German military might. With few effective weapons to halt the German armoured advance and poor communications hindering coordination of units and a lack of air support, the outcome was predictable. IX Corps retreat from the river Somme in Normandy was replicated amongst the rugged mountains of Northern Greece.[36]
Retreating from mountain to mountain, the Greeks, lacking motorised transport, could hardly keep up their British counterparts. Adding to the misery of the inevitable withdraw was the constant waves of German air attacks, which decimated the poultry squadron of RAF Hurricanes sent to provide air cover for Allied troops. After only nineteen days of fighting the Allied forces had been pushed back to Attica. While the Greek prime minister committed suicide, Commonwealth troops were desperately attempting to reach embarkation points along the coast of Attica because the Germans had cut off the British avenue of retreat to the Peloponnese. The result of Churchill’s cavalier approach to the conduct of the war was, 14,000 British soldiers captured, over 2,000 causalities, and the abandonment of equipment that would take years to replace. The loss of these men and equipment would very much be felt in the Maghreb as Rommel raced across the deserts towards Egypt.[37]

Singapore
The fate of the 51st HD at St. Valéry is inherently linked to successive British government’s failure to make prudent assumptions upon which to base their strategic planning during the interwar years. Such failures in planning can also be keenly observed in the British government’s neglect of the fortifications defending Singapore, the Gibraltar of the East. After a string of swift seaborne operations in the winter of 1941, the Japanese had struck a blow to the Americans at Pearl Harbour, invaded the Philippines, and were preparing to strike at resources-rich European colonies that were deemed vital to their war effort. The previous summer, Japanese agents and citizens living in Malaya had provided detailed intelligence on the British defences. These reports highlighted the significant coastal batteries that bristled about the island of Singapore. Due to this information, the Japanese concluded that an invasion from the sea was not feasible. Instead, the Japanese choose to land in the North by Patani and to attack down the Malayan peninsula in order to assault the fortress across the Johore Straits.[38]
The British pre-war strategy for the region centred holding Singapore, which would be used as a base from which to launch counterattacks. The fortifications on the island were the subject of a much-heated debate during the interwar years resulting from the significant expenditures that were draining the Royal Navy’s budget but were completed in 1938. Despite the huge investment, the island’s batteries were constructed solely to defend against an invasion from the sea. The dangers of this problem were outlined in two reports on the defensive deficiencies to the Chiefs of Staff once in 1930 and again in a more detailed brief in 1937. In a glaring lack of foresight, British planners ignored those reports because the War Office never considered that the Japanese would attack from land. These assumptions were grounded in the bigotry of the colonial mindset that could not conceive of the notion of an Asian nation successfully attacking and seizing a British stronghold. [39] The Japanese were quick to exploit this atmosphere of contemptible complacency.
To further add to the dire state of readiness of British forces in Singapore was the questionable appointment of Arthur Percival as the overall commander of the Commonwealth forces in the region. Percival’s training and Great War experiences impressed upon him a defensive warfare mindset, which meant he was ill-prepared to confront a motivated Japanese Army employing their version of Blitzkrieg. Compounding Percival’s command weakness was the deluge of consequences wrought by the malaise and neglect of the military by politicians supporting the defence cuts under the Ten-Year Rule. The 90,000 Commonwealth soldiers tasked with the defence of the island were set adrift by their government to fend for themselves with the inadequate tools they were issued. The RAF’s disposition on the island was little better, with only two squadrons of obsolete Brewster Buffalos and barely 100 Hawker Hurricanes. Both aircraft would be outmatched by nimble Japanese fighters. Surprised by the Japanese bombers many of the RAF fighters never made it into the air. A critical shortage of anti-aircraft guns made the task of defending the main island and the airbases impossible. By the end of the first day of the battle, only fifty RAF aircraft remained to contest the skies above Singapore.[40] The only Royal Navy support came in the form of the ships HMS Prince of Wales and HMS Repulse, the remainder of the Far East Fleet were tasked elsewhere protecting the Empire’s vast trade lanes. On the third day of the battle, December 9th, while Operating without air cover these ships were sunk in an attempt to disrupt the Japanese landings. The British had finally learned the lesson that surface ship could no longer operate without air-support, and the Japanese were now the temporary masters of the Pacific.[41]
On the other hand, Japanese commanders, while operating under their own national assumptions, were able to muster three battle-tested divisions with 200 hundred light tanks in support. The Japanese modelled their division on the composition of the German Wehrmacht and employed a version of combined arms tactics that account for the limited resources that constrained their armies. Once General Tomoyuki Yamashita landed a significant portion of his 23 to 36,000 troops during an uncontested landing, he set his men on their drive south. Percival, failing to create a system of defensive lines down the length of the peninsula and defence-in-depth tactics, resigned the troops under his command to a gruelling struggle to stave off dynamic Japanese attacks that bypassed British strong points along the main lines of communication. After the Japanese outflanked the Indian troops at Keroh, Percival orders his force to make a fighting withdrawal back to the river Perak. Hammered from all sides, the tactical retreat almost became a rout due to the lack of wireless radios to coordinate the movement of troops. In only ten days of fighting the Japanese had pushed Commonwealth troops back 100 miles of difficult jungle terrain. Now the Japanese were within reach of the Malayan capital of Kuala Lumpur. Unfettered by the new British defensive line, the Japanese simply landed troops behind them, by utilising flanking manoeuvres they had captured the half of Malaya in less than two months and had advanced over 500 miles. [42]
With the situation on mainland Malaya untenable, Percival issued the order on the 25th of January 1942 for all Commonwealth forces to fall back to the island of Singapore. With the 90,000 troops under Percival’s command safely across the Johore Straits, he had convinced himself of the certainty of a seaborne invasion near the now destroyed Sembawang Naval Base on the Northern tips of the island but he could also not rule out other possible landing areas. Percival’s solution to this conundrum was to spread his forces thinly along the coastline but concentrating his main defences around Sembawang. Noticing the British troop strength at the base, Tomoyuki Yamashita conducted a bombardment of the area and marched a significant portion of his troops to the location directly across the Johore Straits. But these actions were just a ruse to draw Percival’s attention to the area, while Yamashita’s forces crossed the strait in the west. The sector the Japanese focused their attack was guarded by only 3,000 lightly armed Australians. While causing heavy casualties with machine-gun fire, the waves of Japanese troops overwhelmed the defenders. While this was occurring, Percival still thought the main attack would come from the sea and at Sembawang. Hampered by a lack of communication and wrought with indecision, Percival refused to reinforce the units attempting to contain the Japanese bridgehead. By the time he understood war occurring in the Northwest sector, it was too late. The Japanese had reached the island’s reservoirs and cut the water supply. As portions of the Commonwealth perimeter shrank around the city of Singapore, Percival chose to seek terms from Yamashita on the evening of the 14th of February 1942. Percival surrendered even though he was ordered by Churchill to fight to the last man and disregarding the fact that he still had nearly 130,000 troops with which to continue the fight.[43]
Within seventy days the Gibraltar of the East fell to Japanese troops, who were critically short on ammunition and food.[44] Churchill described the fall of Singapore as “the worst disaster and largest capitulation in British history.” Bewildered he exclaimed, “How came 100,000 men (half of them of our own race) to hold up their hands to inferior numbers of Japanese?”[45] As the sun set on the British Empire, fuming politicians attempted to seek out scapegoats to blame for the defeat, accusations of cowardice displayed by troops, and incompetence on the part of General Percival. All the while, these carrion birds failed to recall their role in the neglect of the military during the interwar years and the false assumptions they made that led to a lack of prudent strategic planning all of which contributed to the capitulation. The military also had a hand in the capitulation. The lack of strategic planning for a land attack and a failure to create defensive lines across the peninsula were significant oversights, especially in light of the fact that the Chiefs of Staff understood Singapore’s weakness that was detailed in two reports. Nevertheless, all that pales in comparison to the lack of proper equipment and training that would enable the troops to be combat effective against the Japanese. The garrison of Singapore suffered from the same equipment issues that led to the capitulations of the 51st HD in France and the BEF sent to Greece. The RAF also suffered from outdated airplanes and insufficient numbers of modern ones to contest the airspace during the Malayan campaign. Moreover, due to a lack of radar, a significant portion of the RAF squadrons was destroyed on the ground. The Royal Navy’s contribution to the battle was a demonstration of gross negligence and was a clear example of the British inability to come to grips with the technological changes to the battlefield.
As Churchill sat, whisky in hand, smoking a cigar in his bunker beneath 10 Downing Street keenly watched a large map elaborately displaying the dynamic shifts in the war, as a child playing an elaborate board game, across the Commonwealth modest families were grief-stricken by the callousness of such a futile and wasteful squandering of lives their husbands, fathers, and sons. Moreover, Churchill deployed the limited resources of the Empire in such a manner that threatened Britain’s ability to maintain the stability of their colonial conquests. The affair of honour in Greece meant that the troops fighting Rommel in the Maghreb were deprived of reinforcements and vital equipment. The lack of strategic planning and bigoted assumptions that fostered the capitulation of Singapore cost the British war effort nearly 130,000 soldiers; most of whom would die in captivity at the hands of their brutal Japanese captors. These events were the direct consequence of British misallocations of limited resources, a lack of prudent planning, and the failure to professionally train and equip the military.
Combat Effectiveness:
The 51st Highland Division in the Battle of France
“Take that to your General”
Questions concerning strategic planning and equipment allocation, of course, are elements that are out of the immediate control of the common soldiery. Despite that fact, some historians[46] have attempted to shift responsibility for the appalling amount of British capitulations during war onto the shoulders of the fighting men. These ill-conceived arguments are not only erroneous but they fail to take into account that the majority of the circumstances that led to the surrender of such large amounts of British troops were a direct consequence of the British government’s chaotic and ill-conceived strategic decisions. Moreover, these historians have called into question the 51st HD’s deficient combat performance as a justification for their inability to hold back the German onslaught, which might have allowed for their evacuation. While that argument may contain a small measure of legitimacy, the truth of the matter is that the British government, in its haste to rearm in 1937 after the malaise of the post-Great War years, sent to France poorly trained and led troops equipped with arms unfit for the task they were ordered to undertake.
Add into the mix the road to redemption historians such as Craig French, Patrick Delaforce, and Richard Doherty,[47] who create a narrative that only touches upon the events at St. Valéry as an afterthought and concentrates their focus on events after the 51st HD’s reconstitution. The implication being that their subsequent efforts throughout the remainder of the war restored the honour of the division. This narrative infers that there was not great courage displayed by the young men fighting in Normandy against an armoured German division steamrolling its way across the French countryside. What these historians fail to comprehend is that it is quite a terrifying task to face tanks with assorted small arms that you have been told will stop such a force but upon use, merely bounce harmlessly off the side of the armour. Then to continually fall back to new positions and to repeat the process, all the while having to see your numbers dwindle with every contact with the enemy. Such exercises in futility require great discipline and are the very definition of courage. However, well equipped and determined enemy or incompetent politicians, the blame for the fate of the 51st HD falls upon the British War Office and Churchill. Both of whom willingly sacrificed the Highlanders in a vain attempt to keep a demoralised France in the war. Moreover, sending poorly trained and equipped troops with questionable allies against a force such as Rommel’s 7th Panzer Division was an imprudent decision at best and bordering criminal at worst.
Setting aside the large issues that contributed to the surrender of the 51st at St. Valéry, questions surrounding the divisions fighting ability need to be briefly redressed. From the onset, the Army decided to strengthen the territorial divisions with regular battalions. The 1st Gordons, 1st Black Watch, and 2nd Seaforths replaced the 6th territorial battalions of the Black Watch, Gordons, and Seaforths. Moreover, the Chiefs of Staff choose to replace most of the territorial officers with regulars throughout the French campaign.[48] These measures in many cases did strengthen the division at some level, however, the nature of the German assault and being placed under the command of the French meant that battalions of the 51st HD were isolated from each other. Despite the separation from the regular units these territorial battalions fought hard and fiercely contested the ground the division which was forced to give up.
From the onset of the division’s assignment to the French command along the Saar region of the Maginot Line, the units performed admirably fending off German diversionary attacks in their isolated positions forward of the mainline. Historians Saul David and Stewart Mitchell point out in their admirable works that were construed upon eyewitness accounts, underscores the larger strategic planning failures of the British government. Throughout the Battle for France, the men of the 51st HD were chronically short of ammunition and rarely received regular meals. The two foremost equipment issues that threaten to break the division, on multiple occasions, were the lack of wireless radios and the absence of an effective anti-tank weapon for the infantry. The combination of these failures in British planning greatly affected the Highlanders combat effectiveness. In fact, ordering men to halt an armoured assault with no means do so and without proper communications to call in artillery or tank support is the definition of futility.
As the Highlanders tested their mettle along the Maginot Line, they gained confidence and developed methods to work around the deficiencies in their equipment. Maginot line incomplete forward positions that would not support mutually each other, meant that isolated platoons fought desperate battles to defend their outpost against larger German infantry assaults.[49] But events in the Ardennes required them to be pushed 300 miles to the Northern front near Abbeville. Taking up positions along with French IX Corps under the command of General Ihler, the division was ordered to defend a 23 mile stretch of along the Somme from Abbeville to Erondelle on the coast. The understrength battalions could not hope to hold such an extensive defensive line. Indeed, company level fighting positions were more than a mile apart in many places, again these men would be forced to fight as isolated individual units.[50]
Due to the failure of the French to reinforce their positions along Somme River with some of seventeen divisions defending the Maginot Line, the Highlanders containing the German bridgehead at Abbeville were again holding ground where their fighting positions could not support each other. When the German’s began their assault, the result of this French failure to prudently manage their forces was that the Panzer divisions simply drove past the positions held by the 51st HD, which caused the vital artillery batteries to withdraw. Without artillery support, ammunition all but exhausted, and German troops steaming through their lines, Highland officers vainly requested permission from the French command to withdraw in order to re-establish a defensive line. Those orders never arrived which lead to the encirclement and capitulation of the 7th Argylls, who found themselves five miles behind the German line of advance by nightfall on the 5th of June.[51]
The rapid German advance coupled with the overextended Allied lines meant that Highlanders defending these unsupported positions often did not receive orders to withdraw with their companies.[52] The effect of the French failures tactical and the imprudence of British logical allocations before the war was a criminal failure to provide communication capability that directly fostered the capitulation of troops because they could not effectively coordinate their efforts. Escaping one encirclement attempt by employing local initiative, Captain Inglis of the 8th Argylls recounted that “…it may be said that we were not really holding roads. We were really only an island of resistance, causing nuisance value and occupation of enemy troops…” Captain Inglis and the remnant of his company would be surrounded in a chateau near Belloy.[53] After the stubborn defence, Inglis was forced to surrender on the morning of the 7th of June as that Germans shells brought the walls of the chateau down around the remaining defenders.
Despite the valiant effort to stem the flood of German troops, the 51st HD was forced to withdraw to the river Bresle. The most remarkable example of the fighting spirit during The Battle of Abbeville was the remarkable feat of Major Lorne Campbell. After the Germans punched through the French lines at Amiens, the B Company of the 8th Argylls still held their positions at Ault where the Somme pours into the sea, the speed of the German advance had cut them off from the rest of the division. Unbeknownst to Major Campbell, the division was withdrawing to the new defensive line. Finding that there were German in his rear, Campbell, compass in hand, led the men of A and B companies of the 8th Argylls along with the Royal Scots Fusiliers on a fighting march 14 miles to the new Allied line along the Bresle. During the march Campbell only lost three men out of 200. In recognition of Campbell’s bravery and leadership, he was awarded the Distinguished Service Order.[54]
Meanwhile, the Germans had captured Rouen. French orders were given to withdraw across the Seine. Unable to reach the river, IX Corps headed for the port of St. Valéry vainly hoping to be evacuated. While the outcome of those events has already been discussed, what often gets lost in the sweeping battle narratives are the individual stories like Major Campbell, who also made a daring escape from St. Valéry and would go on command the reconstituted 7th Argylls for the remainder of the war. There are hundreds more examples of the bravery and determination to resist by the men of the 51st HD. Indeed, when coupled with the numerous and gripping escape stories, one is hard-pressed to understand how some historians have called into doubt these stalwart Highlanders. With that point in mind, arguments concerning the combat effectiveness of the 51st HD can only be explained as a direct result of the failures of the British government to maintain the readiness of its forces during the interwar years in conjunction with the questionable conduct of their French counterparts.
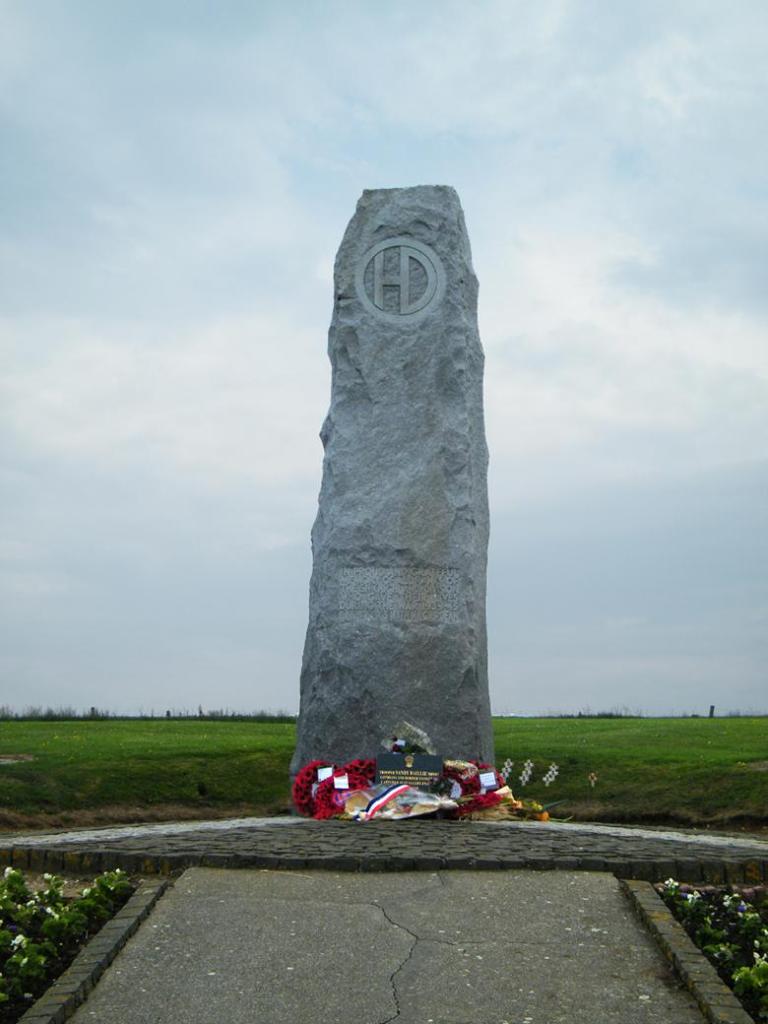
Despite the capitulation, the leader of the Free French, Charles de Gaulle, recounted one of the significant legacies of the 51st HD’s actions throughout the Battle for France in a speech delivered in Edinburgh in 1942:
For my part, I can say that the comradeship of arms, sealed on the battlefield of Abbeville in May-June 1940, between the French armoured division, which I had the honour to command, and the gallant 51st Scottish Division under General Fortune, played its part in the decision which I made to continue the fight at the side of the Allies, to the end, come what may.[55]
The courage displayed by the 51st HD was the subsequent inspiration for De Gaulle to continue the struggle when his countrymen crumbled under the weight of the German onslaught. The encouragement of the Free French is but one demonstration of the remarkable legacy that the men of the division achieved. By stubbornly opposing the German advance they occupied the full attention of Rommel’s forces during those dark days of early June. These humble young lads from North of the Stirling line, purchased with their lives just enough time for De Gaulle and hundreds of French soldiers’ time to seek refuge in Britain. Additionally, the fighting spirit of the soldiers of the division was not dampened by their defeat at the hands of a better-equipped force nor their abandonment by their own government. On the contrary, individual soldiers continued to resist and made heroic escapes in order to re-join the war effort. It is due to the audacity of these men that the works of historians such as Sula David and Stewart Mitchell are important because they set the record straight and recount compelling stories of resistance that should be made known to a broader audience instead of anguishing as a neglected footnote to the prelude to the Battle of Britain.
Subsequently, the bravery of the men of the division can be observed in one dramatic episode on the outskirts of St. Valéry. While defending an improvised position comprised of burnt vehicles along the main road to the town, Lieutenant Brian Hay of the 5th Gordons was approached by a French officer waving a white flag accompanied by two Germans. The Frenchmen told them that a German General was ordering them to surrender. Incensed by such a demand, Hay’s, and his meagre detachment of men, having no intention to comply, offered the French officer a uniquely Scottish response filled with colourful language; adding “take that to your General!” The speechless and trembling Frenchmen walked away with an expression of dread as he pondered how to confer that message to the Germans.[56]
A Demoralised France & Desertion by The War Office

Contrary to historian Robert Forczyk’s overarching narrative about the relative effectiveness of the French troops during the Battle of France in his excellent work, Case Red, the collective eyewitness accounts from the soldiers of the 51st HD stand as a testament to the general defeatist disposition of the French commanders and troops. Indeed, the French General Staff were comprised of creatures from the convoluted bureaucracy of the Third Republic. They were politician soldiers, whose fighting days had long since passed.[57] It was for that reason, French primer, Reynaud, replaced General Gamelin with Weygand in a vain attempt to find a general officer with the stomach to fight.[58] Yet, the social and political issues within France ran much deeper. France had a strong Leftist movement that greatly concerned the conservative leadership of the time. Containing these violent forces was the primary preoccupation of the many within the government, not halting the German’s rampaging through France. As the realisation that the French Army could no longer withstand the German attack, the thoughts of these politician soldiers turned towards the preservation of France with enough troops to quell a revolution from the left.[59] Both Marshal Pétain and General Weygand were deeply concerned about such matters. In a speech given in 1934, Pétain railed against French schools that “neglect and at times even oppose instruction in patriotism.” “Today” he continued, “our education system pursues as the sole aim the development of the individual considered as an end in himself. The members of the teaching profession devote themselves quite openly to the end of destroying the state and society.”[60] Echoing Pétain’s position days before the French surrender, Weygand also blamed Leftists and schoolteachers “who have refused to develop in the children a sense of patriotism and sacrifice.” France was a bitterly divided nation that could not unite to stop the Germans.[61]
These social and political divisions with the French polity were evident within the ranks of the common conscript soldiery from the onset. The Highlanders quickly picked up on the defeatist demeanour of French troops as they replaced them in the outlying positions in the Saar region of the Maginot Line. Major Grant of the 2nd Seaforths recounted in his diary multiple instances where French troops were often drunk and French commanders forbade him from engaging the enemy. Sergeant John Mackenzie even had his weapons hidden from him during transfer of command operations with the 102nd French Regiment. Tasked to observe a French counter raid operation, Mackenzie sat defenceless as the unit refused to engage or support the Foreign Legion units on the right of his fighting position. [62]
This situation became more acute when the 51st HD was transferred to the front near Abbeville. During the counterattack on the German bridgehead, the disorganised French troops altered the German’s to the attack, which allowed them the time to move portions of their troops away from the artillery bombardment. The remainder of the attack followed a similar pattern, French units show up late to departure points, committed fratricide, and fled their positions after staining minimal resistance. The excuse for the French retreat was blamed on a non-existent German counterattack, which was merely the return of the French Groupement Cuirasse units from their failed assault near Les Trois Mesnils. To add to the list of woes that day, when French units were ordered to relieve hard-pressed Highland units, they refused to assume responsibility for those sectors. The French cavalry unit sent to close the breach in the line never appeared, leaving a 7-mile gap. After the failed assault during which the 51st HD’s engaged battalions suffered 50 per cent casualties coupled with the French dissertations, General Fortune was left with meagre force to hold his 23-mile front. Once the German’s pressed their advantage and the order to withdraw to the Bresle was given, the Highlanders were shocked to find their allies had already abandoned their positions. The shameful conduct of French troops at Abbeville would be repeated throughout the entirety of the campaign and culminate in the near-complete breakdown of their forces during the defence of St. Valéry. [63]
As the war effort progressively worsened and anticipating defeat, the French looked for a scapegoat. At first, Weygand instated French woes were the fault of General Gort, the British commander of the BEF I. But after Dunkirk, his wrath was turned towards General Fortune and the British in general. Both Reynaud and Weygand demanded more British infantry divisions, tanks, and additional fighters to shore-up his crumbling army. These demands, of course, went against Britain’s policy of limited liability and endangered the defence of the nation from the threat of German air-raids. On the 6th of June 1940, General Spears, a British Army attaché, attended a meeting of the French War Committee were Weygand’s blatant hostility shocked him. After the meeting, Pétain had to take Spears aside and inform him that the battle was as good as lost because the French had no reserves and they were fighting against German forces that outnumbered them two to one. Spears relayed this encounter to General Dill and the War Office.[64]
The War Office and Churchill’s first indications that the French morale was cracking became apparent in early May when despondent Reynaud telephoned Churchill exclaiming “We are defeated; we have lost the battle.” From that point on Churchill was playing a dangerous political game in an attempt to persuade the French to remain in the fight. In order to buy time for Britain’s own preparedness, Churchill set about on a policy of keeping the French motivated and the fighting must remain on the Continent for as long as possible. However, the French war effort was crumbling faster than anticipated. In a report to the Chief of Military Operations in London, Major General Dewing highlighted the seriousness of the tactical situation in France. Dewing maintained that the BEF should be placed back under the control of the British that their forces should be withdrawn South of the Seine. Seeking clarity, General Dill interviewed Lieutenant General Alan Brooke, who was fresh from the beaches of Dunkirk. Brooke was candid about his experiences operating with the French and believed that they could not hold out much longer. When Dill pressed Brooke with questions concerning Churchill’s policy, he said that he had “very great doubts as to any political advantages to be gained” by keeping the French in the war. Disregarding this advice, Churchill continued to argue that Britain would fall without the French and not allowing France to deprive Britain of her aircraft. On the 1st of June when Reynaud again requested more troops and aircraft, Churchill haggled with him attempting to not send significant numbers of fighters in exchange for the promise of more ground troops. Citing the losses suffered during the Dunkirk evacuation, he claimed that it was impossible to send the number of aircraft Reynaud wanted but he would send more troops. Incensed by Churchill’s response, Weygand accused him of “playing a double game.” Churchill was playing politics and gambling with the lives of men in a vain quest to sustain French morale. If Churchill had been aware of the conversation that the American Ambassador to France, William Bullitt, had with Marshal Pétain during which Pétain said that they would be immediately seeking the best terms possible with Germany, he might not have been so keen to continue to roll the dice.[65]
While Churchill was preoccupied with keeping France in the war, the British attaché to the French X Army, General James Marshall-Cornwall sent another report to General Dill on the 4th of June. In the report, Marshall-Cornwall in no uncertain terms made it abundantly clear that he had little faith in the French ability to continue the war. More importantly, he warned that if the 51st HD was not returned to British command it would be forced into the Le Havre peninsula and trapped. Agreeing with General Dewing, he also recommended that the 51st HD withdraw across the Seine. On June 6th, Marshall-Cornwall followed up his first report with another, again emphasising the dire situation of the Highlander. Piercing the curtain between the military and civil government, he had discovered Churchill’s political gamble. He then requested that if the 51st HD could not be withdrawn; the War Office should immediately send reinforcement and provide fighter cover for the embattled Highlanders. Two days later General Spears would have to endure Weyand’s tirade and pass on his conversation with Marshal Pétain. The following day Marshall-Cornwall sent yet another report detailing the tactical situation in France as well as Weygand’s delusional rantings.[66]
By the morning of the 8th of June, the truth of the situation in France was evident to the War Office and the Chiefs of Staff. The 51st HD was in grave danger of encirclement and Britain should press France to withdraw them below the Seine. However, none of either party dared raise the possibility of a seaborne evacuation to Churchill. Not wanting to rock the boat, later that day during a Defence Committee meeting, Churchill was briefed on the state of affairs with the 51st HD. Based on the recollections of the committee members, Churchill ignored the brief and concentrated on Reynaud’s incessant request for fighters, saying that the “present battle was of great importance…but it would not prove decisive one way of the other for Great Britain.” [67] While no notes from the meeting exist, it is interesting that shortly after midnight the Royal Navy was ordered to mine the harbours along the coast of Le Havre.
Such an action would have made the evacuation of the 51st HD impossible. The other intriguing element to these events is the fact that when General Fortune was debating which port to withdraw towards he was not informed by the War Office of the June 9th Naval Intelligence’s Daily Summary concerning the functionality of ports along the Normandy coast, which indicated that the Dieppe’s harbour was still suitable for naval operations. Given the proximity of the 51st HD to Dieppe, General Fortune should have concentrated his forces there and at the beaches of Pourville instead of St. Valéry. That same night Fortune sent two telegrams to the War Office informing them that the Germans had blocked his route to Rouen and that he was headed for the port of Le Havre for evacuation. He added an urgent plea for “maximum air support.” No such support arrived from the War Office, only a repeat of Weygand’s orders to fight their way over the Seine. The office also neglected to forward the naval report on the disposition of the harbour at Dieppe. [68]
In another desperate communiqué on the 11th requesting equipment to facilitate a naval evacuation, response the War Office with Weygand’s orders and a note reminding Fortune of the “importance of acting in strict conformity with any orders IX Corps commander may issues.” That last order must have confused Fortune because he was the acting commander of IX Corps after General Ihler relinquished command due to the mental strain of the campaign. The War Office knew the dire situation that the Highlanders were in but refused to take steps to save the division from encirclement. In the meticulously researched book, After Dunkirk, Saul David maintains that Churchill, possibly, thought that by sacrificing the 51st HD it would mend the rift between the Allies and make up for General Gort’s Dunkirk evacuation, as well as the withholding of fighters. Thus, keeping the French in the war. Moreover, the evacuation of the Highlanders did not warrant the loss of valuable fighters, which explains why the RAF was hardly seen throughout the campaign.[69] Given Churchill’s long history of callous political machinations, such cold calculations are not beyond the realm of plausibility.
St. Valéry
Reconsideration
For the enlisted men of the 51st HD, June 12th, 1940 was the beginning of a long road march to Germany and Eastern Europe were a fiendish five years of captivity awaited them. While the officers were treated relatively well, the common soldiery was forced to labour in salt mines and on other Nazi projects. Winston Churchill, commenting on the events that fostered the capitulation in his history of the war, shifted the blame onto the French and their “gross mismanagement” that did not allow for the 51st HD to retreat South of Rouen.[70] From the evidence presented in this rumination, there is truth in his assertion. The French had a sizeable share of the blame due to the misallocation of their limited resources before the war and the pervasive defeatism caused by the fractured state of their polity. Nevertheless, in 1953 when Churchill published his history, he still could not take reasonability for his active role in the events and his political gamble to keep the French in the war, which turned out to be a significant miscalculation. Churchill also forgets to mention that during the interwar years where he held various offices in successive British governments, where he too advocated for the Ten-Year Rule that condemned the Army and Air Force to languish in mediocrity.[71]
By ignoring the requirement to maintain a state of readiness within the armed forces, politicians like Churchill commanded Commonwealth citizens to sacrifice their lives in defence of the Empire against an enemy they were ill-prepared and equipped to fight. Moreover, throughout the war, Churchill was solely responsible for the circumstances that led to significant capitulations of British troops in Greece and Singapore. Despite all of Churchill’s triumphs, he allowed his erroneous sense of honour and prejudicial assumptions to guide his policy decisions. Such personal failures cost the common soldier dearly. While ordering men to undertake dangerous missions that might cost them their lives is a reality of warfare, a prudent leader does not needlessly waste the lives of his soldiers and only asks them to perform tasks he also is willing to undertake. Churchill’s life is replete with examples of his narcissistic nature that drove him to make self-serving decisions that cost good men their lives; the Gallipoli campaign during the Great War is the foremost demonstration of that point.
With blame enough to go around, General Fortune had his share for failing to choose the port of Dieppe as a suitable point of embarkation and to exercise greater individual discretion on the battlefield. However, Fortune’s decisions were based on three failures of the British government: 1) the War Office’s failure to inform Fortune of the Naval intelligence report on the evening of June 8th stating that the port at Dieppe was relatively operational. 2) The War Office did not grant Fortune command digression like General Gort, which chained the Highlanders to the increasingly detached fantasies of Weygand. 3) By June 8th, the British government knew the dire situation of the 51st HD. Churchill ignored those briefings because he was prepared to sacrifice the Highlanders in a pretentious political gamble and ensured that Admiral Sir James’s taskforce had time insufficient, as well as the necessary support to evacuate the men.
The brave and tenacious men of the 51st HD paid a terrible price for the miscalculations of Churchill, as well as successive inter-war governments. Throughout the campaign11,000 British soldiers were made prisoners of war, 1,000 were killed, and 4,000 were wounded.[72] Languishing in German prison camps many men of the 51st HD came to realise the nature of the betrayal perpetrated against them by their government. Reflecting on the campaign Major Wattie McCulloch wrote:
At this time France was on the verge of collapse and every effort was being made to keep her ‘in the war.’ It was no doubt thought that the desertion by the Division at this point of it French comrades would be fatal to the negotiations. One is forced to conclude, therefore, that it was deliberately sacrificed as a political pawn. Whether this sacrifice was worthwhile is not for me to say. In the light of after events, it seems not.[73]
Years later Fortune’s Intelligence Officer, Captain Ian Campbell, added:
It has always been abundantly clear to me that no Division has ever been more uselessly sacrificed. It could have been got away a good week before but the powers that be- and owing I think to very faulty information- had come to the conclusion that there was a capacity for resistance in France which was not actually there.”[74]
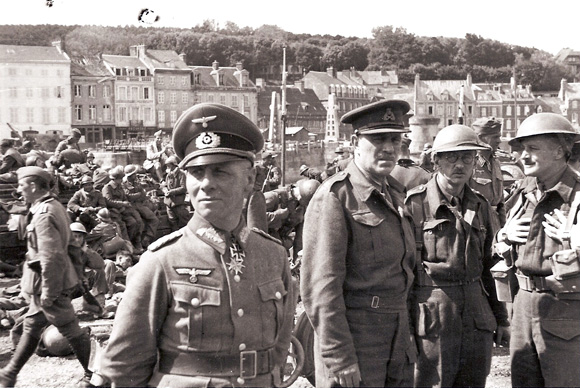
The men of the 51st HD knew the British leadership was clearly responsible for their fate. Nevertheless, historians who attempt to shift the blame on to the men of the division fail to appreciate the totality of the factors that made the unit combat ineffective. Failures in strategic planning made by pre-war British governments contributed to the loss of vital British fighting men, such as those of the 51st HD, as well as critical war material throughout the Second World War. Moreover, Churchill’s misguided affairs of honour and political gaming cost the Commonwealth irreplaceable men in a fruitless attempt to defend a crumbling Empire. Despite the odds that were stacked against them and being abandoned by their government, the men of the 51st HD conducted themselves in true Highland fashion. Regardless of the lack of proper training, anti-tank weapons, ammunition, and communications equipment the Highlanders resolutely contested every inch of ground. The paper of General Rommel, [75] General De Gaulle’s sentiments expressed in his 1942 speech, the hundreds of stories demonstrating the bravery displayed by these Highlanders throughout The Battle of France, and the 134 thrilling escapes from German prisons stands as a testament to the division’s will to fight.
Bibliography
Alexander, Martin S. “After Dunkirk: The French Army’s Performance against Case Red, 25 May to 25 June 1940.” War in History 14, no. 2 (2007): 219-64. doi:10.1177/0968344507075873.
Archives, The National. “The Ten-Year Rule and Disarmament.” November 28, 2008. https://www.nationalarchives.gov.uk/cabinetpapers/themes/10-year-rule-disarmament.htm.
Beevor, Antony. The Second World War. London, UK: Little, Brown, and Company, 2012.
Buckley, John. Monty’s Men: The British Army and the Liberation of Europe. New Haven, CT: Yale University Press, 2014.
Caskie, Donald. The Tartan Pimpernel. Edinburgh, UK: Birlinn, 1957
Churchill, Winston S. The Second World War. Chartwell ed. Vol. 2. Boston, MA: Houghton Mifflin Harcourt, 1983.
Connelly, Mark, and Walter Miller. “The BEF and the Issue of Surrender on the Western Front in 1940.” War in History 11, no. 4 (2004): 424-41. doi:10.1191/0968344504wh308oa.
Copp, Terry. Fields of Fire: The Canadians in Normandy. Toronto, CA: University of Toronto Press, 2004.
__________. The Normandy Campaign 1944: Sixty Years On. Edited by John Buckley. London, UK: Routledge, 2007. David, Saul. After Dunkirk: Churchill’s Sacrifice of the Highland Division. London, UK: Endeavour Press, 2017.
David, Saul. After Dunkirk: Churchill’s Sacrifice of the Highland Division. London, UK: Endeavour Press, 2017.
Davies, Anthony C. “WW2 British Army Battlefield Wireless Communications Equipment.” Applied Electronics, September 2009. doi:10.1109/histelcon.2008.4668720.
De Gaulle, Charles. “Speech Delivered by General De Gaulle at Edinburgh, 23rd June 1942.” Speech Delivered by General De Gaulle at Edinburgh, 23rd June 1942. Accessed August 30, 2020. https://electricscotland.com/france/degaulle.htm.
Delaforce, Patrick. Monty’s Highlanders: 51st Highland Division in the Second World War. Barnsley, UK: Pen & Sword Military, 2000.
Doherty, Richard. None Bolder: The History of the 51st Highland Division. Stroud, UK: Spellmount, 2006.
Farrell, Brian. The Defence And Fall Of Singapore. Singapore: Monsoon Books Pte., 2016.
Forczyk, Robert. Case Red: The Collapse of France. Oxford, UK: Osprey Publishing, 2017.
French, Craig F. “The Fashioning of Esprit De Corps in the 51st Highland Division from St Valery to El Alamein.” Journal of the Society for Army Historical Research 77, no. 312 (Winter 1999): 275-92. https://www.jstor.org/stable/44225809.
Grant, C. S. “Surrender at St. Valéry June 1940.” 51st Highland Division. Accessed October 12, 2020. https://51hd.co.uk/history/valery_1940.
Kandel, I. L. “The Vichy Government and Education in France.” Bulletin of the American Association of University Professors 27, no. 1 (1941): 88-91. doi:10.2307/40219184.
King, Anthony. “Why Did 51st Highland Division Fail? A Case-study in Command and Combat Effectiveness.” British Journal for Military History 4, no. 1 (2017). http://bjmh.gold.ac.uk/article/view/773.
Lovell, Richard H. Churchill’s Doctor: A Biography of Lord Moran. New York, NY: Parthenon, 1993.
Mackenzie, S. P. The Colditz Myth: British and Commonwealth Prisoners of War in Nazi Germany. Oxford, UK: Oxford University Press, 2004.
Mitchell, Stewart. St Valéry and Its Aftermath: The Gordon Highlanders Captured in France in 1940. Barnsley, UK: Pen & Sword Military, 2017.
Nichol, John, and Tony Rennel. The Last Escape: The Untold Story of Allied Prisoners of War in Germany 1944-5. London, UK: Penguin Books, 2002.
Reoch, Ernest. The St. Valery Story. Inverness, UK: Highland Printers, 1965.
Rommel, Erwin. The Rommel Papers. Edited by Basil Henry Liddell Hart. Compiled by Lucie-Maria Rommel, Manfred Rommel, and Fritz Bayerlein. Translated by Paul Findlay. London, UK: Collins Publishing, 1953.
Wildenberg, Thomas. Billy Mitchell’s War with the Navy: The Interwar Rivalry Over Air Power. Annapolis, MD: Naval Institute Press, 2013.
Foot Notes
[1] Robert Forczyk, Case Red: The Collapse of France. (Oxford, UK: Osprey Publishing, 2017), 242-310, and Saul David, After Dunkirk: Churchill’s Sacrifice of the Highland Division. (London, UK: Endeavour Press, 2017), 191-205.
[2] Before sending the 51st Highland to France, as part of the BEF, the War Office ordered the division to turn in their entrenching tools. see; Saul David, After Dunkirk, 95.
[3] Saul David, After Dunkirk, 245, and Stewart Mitchell, St Valéry, and Its Aftermath: The Gordon Highlanders Captured in France in 1940. (Barnsley, UK: Pen & Sword Military, 2017), 40.
[4] Stewart Mitchell, St Valéry and Its Aftermath, 40.
[5] Saul David, After Dunkirk, 264, 270-279, and Robert Forczyk, Case Red, 314.
[6] Saul David, After Dunkirk, 269-271.
[7] Stewart Mitchell, St Valéry and Its Aftermath, 43.
[8] Saul David, After Dunkirk, 287.
[9] Saul David, After Dunkirk, 281-283.
[10] Saul David, After Dunkirk, 286-287.
[11] Stewart Mitchell, St Valéry and Its Aftermath, 44, Saul David, After Dunkirk, 299-306, and Robert Forczyk, Case Red, 314-315.
[12] There is little agreement on the actual number of British prisoners of war. For more on this discussion, see John Nichol, and Tony Rennel. The Last Escape: The Untold Story of Allied Prisoners of War in Germany 1944-5. (London, UK: Viking, 2002), 416-420.
[13] S. P. Mackenzie, The Colditz Myth: British and Commonwealth Prisoners of War in Nazi Germany. (Oxford, UK: Oxford University Press, 2004), 292.
[14] See; Terry Copp, ‘The 21st Army Group in Normandy: towards a new balance sheet’ in John Buckley (ed.) The Normandy Campaign 1944: Sixty Years On, (London: Routledge, 2006), 11-21; Terry Copp, Fields of Fire: the Canadians in Normandy, (Toronto: University of Toronto Press, 2003); John Buckley, Monty’s Men, (New Haven: Yale University Press), 139.
[15] Robert Forczyk, Case Red, 44-45.
[16] Saul David, After Dunkirk, 7, 19, 34.
[17] Robert Forczyk, Case Red, 44-45.
[18] See; Thomas Wildenberg, Billy Mitchell’s War with the Navy: The Interwar Rivalry Over Air Power. (Annapolis, MD: Naval Institute Press, 2013).
[19] Robert Forczyk, Case Red, 51-52.
[20] Antony Beevor, The Second World War, 123.
[21] Robert Forczyk, Case Red, 47-50.
[22] Robert Forczyk, Case Red, 50-51, 57.
[23] Robert Forczyk, Case Red, 54.
[24] Saul David, After Dunkirk, 3, and Robert Forczyk, Case Red, 59.
[25] Saul David, After Dunkirk, 3.
[26] Saul David, After Dunkirk, 4.
[27] Saul David, After Dunkirk, 2.
[28] Saul David, After Dunkirk, 3, and Robert Forczyk, Case Red, 59-61.
[29] Saul David, After Dunkirk, 4-5, 175.
[30] For a more detailed discussion on British communications during the Second World War see; Anthony C. Davies, “WW2 British Army Battlefield Wireless Communications Equipment.” Applied Electronics, September 2009. doi:10.1109/histelcon.2008.4668720.
[31] The role that communications played in the encirclement of the 51st HD and its ability to be combat effective was hinged upon their lack of proper wireless radios, see; Saul David, After Dunkirk, 33, 115, 124-124, 129, 143, 145, 179, 201, 215, 237, 238-239, 269-271, 302-303.
[32] Saul David, After Dunkirk, 7.
[33] Robert Forczyk, Case Red, 59-61.
[34] Saul David, After Dunkirk, 68,111, 117-121, 224.
[35] Antony Beevor, The Second World War, 156.
[36] Antony Beevor, The Second World War, 156-158.
[37] Antony Beevor, The Second World War, 158-163.
[38] Antony Beevor, The Second World War, 254, and Brian Farrell, The Defence And Fall Of Singapore. (Singapore: Monsoon Books Pte., 2016), 120-270.
[39] Antony Beevor, The Second World War, 253, and Brian Farrell, The Defence And Fall Of Singapore, 120-270.
[40] Antony Beevor, The Second World War, 255
[41] Antony Beevor, The Second World War, 255-257, and Brian Farrell, The Defence And Fall Of Singapore, 120-270.
[42] Brian Farrell, The Defence And Fall Of Singapore, 120-270.
[43] Antony Beevor, The Second World War, 263.
[44] Antony Beevor, The Second World War, 262-264.
[45] Richard H. Lovell, Churchill’s Doctor: A Biography of Lord Moran. (New York, NY: Parthenon, 1993), 29.
[46] See; Terry Copp, ‘The 21st Army Group in Normandy: towards a new balance sheet’ in John Buckley (ed.) The Normandy Campaign 1944: Sixty Years On, (London: Routledge, 2006), 11-21; Terry Copp, Fields of Fire: the Canadians in Normandy, (Toronto: University of Toronto Press, 2003); John Buckley, Monty’s Men, (New Haven: Yale University Press), 139, and Anthony King, “Why Did 51st Highland Division Fail? A Case-study in Command and Combat Effectiveness.” British Journal for Military History 4, no. 1 (2017). http://bjmh.gold.ac.uk/article/view/773.
[47] See, Craig F. French, “The Fashioning of Esprit De Corps in the 51st Highland Division from St Valery to El Alamein.” Journal of the Society for Army Historical Research 77, no. 312 (Winter 1999): 275-92, Patrick Delaforce, Monty’s Highlanders: 51st Highland Division in the Second World War. (Barnsley, UK: Pen & Sword Military, 2000), and Richard Doherty, None Bolder: The History of the 51st Highland Division. (Stroud, UK: Spellmount, 2006).
[48] Saul David, After Dunkirk, 13.
[49] Saul David, After Dunkirk, 17-29.
[50] Saul David, After Dunkirk, 31-35, 74.
[51] Saul David, After Dunkirk, 145.
[52] Saul David, After Dunkirk, 173, 178-179.
[53] Saul David, After Dunkirk, 150.
[54] Saul David, After Dunkirk, 156-160.
[55] Charles De Gaulle, “Speech Delivered by General De Gaulle at Edinburgh, 23rd June 1942.” Speech Delivered by General De Gaulle at Edinburgh, 23rd June 1942. https://electricscotland.com/france/degaulle.htm.
[56] Stewart Mitchell, St Valéry and Its Aftermath, 41.
[57] Antony Beevor, The Second World War. (London, UK: Little, Brown, and Company, 2012), 83.
[58] Saul David, After Dunkirk, 60-61.
[59] Antony Beevor, The Second World War, 116-117.
[60] I. L. Kandel, “The Vichy Government and Education in France.” Bulletin of the American Association of University Professors 27, no. 1 (1941), 88-89.
[61] Antony Beevor, The Second World War, 117.
[62] Saul David, After Dunkirk, 22-23.
[63] Saul David, After Dunkirk, 89, 97, 107, 110-111, 178-179, 181, 186, and Alexander, Martin S. “After Dunkirk: The French Armys Performance against `Case Red, 25 May to 25 June 1940.” War in History 14, no. 2 (2007): 219-64. doi:10.1177/0968344507075873.
[64] Saul David, After Dunkirk, 60-65, 70, 72, 180.
[65] Saul David, After Dunkirk, 55-56, 69, 77, 79, 117-120.
[66] Saul David, After Dunkirk, 121, 193-195, 205.
[67] Saul David, After Dunkirk, 205, 208-209, 218-219.
[68] Saul David, After Dunkirk, 205, 208-209, 218-219.
[69] Saul David, After Dunkirk, 248-249.
[70] Churchill, Winston S. The Second World War. Chartwell ed. Vol. 2. (Boston, MA: Houghton Mifflin Harcourt, 1983), 134.
[71] The National Archives, “The Ten-Year Rule and Disarmament.” November 28, 2008. https://www.nationalarchives.gov.uk/cabinetpapers/themes/10-year-rule-disarmament.htm.
[72] C. S. Grant, “Surrender at St. Valéry June 1940.” 51st Highland Division. Accessed October 12, 2020. https://51hd.co.uk/history/valery_1940.
[73] C. S. Grant, “Surrender at St. Valéry June 1940: McCulloch, Major, W, War Diary: August 1939-1940” 51st Highland Division. Accessed October 12, 2020. https://51hd.co.uk/history/valery_1940.
[74] Ernest Reoch, The St. Valery Story. (Inverness, UK: Highland Printers, 1965), 22.
[75] Erwin Rommel, The Rommel Papers. Edited by Basil Henry Liddell Hart. Compiled by Lucie-Maria Rommel, Manfred Rommel, and Fritz Bayerlein. Translated by Paul Findlay. (London, UK: Collins Publishing, 1953), 65.
